Uncategorized

We’ve moved to www.roseandlea.com

Hey Guys!

We have been blogging for 6 months now and we decided it was time for a change to our site! We appreciate all of our follower friends and the support we’ve received so far. We hope you continue to share in our journey! 

Find us at www.roseandlea.com

Laura & Natasha xo

Standard
Recipes

Decadent Double Layer Chocolate Cake

Image

Chocolate Lovers – this one’s for you.

This cake is hands down, the best homemade chocolate cake recipe ever.
You’ve gotta trust us on this one – we’ve tested many different kinds of chocolate cake recipes over the years, and this one blows away all the others.

This cake is soft, light, fluffy, and perfectly chocolatey. {All the things a good chocolate cake should be.}

The cake’s super fluffy & moist texture is due in part to a few things.. the use of buttermilk, and coffee! That’s right – 1 cup of hot coffee is used in this cake to help accentuate the chocolate flavour. Don’t worry, it will NOT make the cake taste like coffee.
Buttermilk is also used to help keep the cake super moist. (Buttermilk really is a great baking ingredient for cakes & cupcakes.)

For the frosting, we decided to ditch the usual chocolate buttercream that is often used for this kind of cake and went with a Chocolate Whipped Cream Frosting instead. Neither of us are big fans of buttercreams, as they are usually extremely sweet and overpowering. We always tend to frost cakes using a whipping cream frosting because it is a lot lighter, less sweet, and just seems to taste better & fresher.

Natasha made this cake a few weeks ago for a birthday, and everybody raved about the cake so we decided to make a Valentine’s version! This chocolate cake is perfect for any occasion – decorate it however you wish! 🙂

Image

Image

Image
Nummm! You can see just how moist & fresh the cake is.

This cake is amazing because it actually stays fresh like this for days after baking!
{Keep cake covered at room temperature for up to 4 days to ensure freshness, or covered and refrigerated for up to 6 days.}

Image

IMG_2562

Image

Image

Decadent Double Layer Chocolate Cake Recipe + Directions

Note: it is very important that eggs are at room temperature for this recipe! using eggs at room temperature will allow the cake to rise properly. using cold eggs could ruin your cake.

Ingredients:

For the Cake:
1 and 3/4 cups all-purpose flour
1 and 3/4 cups granulated sugar
3/4 cup unsweetened cocoa powder {not dutch processed}
1 teaspoon baking powder
2 teaspoons baking soda
1 teaspoon salt
1 cup buttermilk
1/2 cup vegetable oil
2 large eggs, at room temperature
1 teaspoon pure vanilla extract
1 cup freshly brewed hot coffee

Chocolate Whipped Cream Frosting Ingredients:

250g whipping cream
Nestle Nesquik Chocolate Syrup (to taste)

Directions:

Butter & flour two 9-inch round cake pans & set aside. Preheat oven to 350 degrees F.
In a medium bowl, sift together the flour, sugar, cocoa powder, baking powder, baking soda, & salt; set aside.

In the bowl of your stand mixer fitted with the paddle attachment, combine the buttermilk, oil, room temperature eggs, & vanilla.
With the mixer on low-speed, slowly add the dry ingredients to the wet until just combined. Add in the coffee. {Batter will be very wet – it is supposed to be. don’t worry!}

Pour the batter evenly into the 2 prepared baking pans and bake for approx. 24-28 minutes, until a toothpick inserted in the center comes out clean. Allow to cool completely before frosting.

For the Frosting:

In the bowl of your stand mixer fitted with the beater/whip attachment, whip the whipping cream on medium-high speed for 2-5 minutes until light and fluffy. Add in chocolate syrup to taste, and mix.

IMG_255923

Happy Valentine’s Baking!
Natasha & Laura xo

Standard
Recipes

Mini Red Velvet Donuts

Image

Valentine, Oh Sweet Valentine!
{We’re at it again. We can’t be stopped now, we’re on a roll.}
This time we decided to try these delicious Red Velvet Mini Donuts. Oh so adorable.

These red velvet donuts are little mouthfuls of Valentine’s goodness. If you love red velvet, you will looove these donuts!
They are soft & not overly sweet. The icing balances the overall flavour, and adds that little bit of sweetness that red velvet cakes need.
Being that these are mini donuts, you can feel less guilty about devouring 10 of these little guys instead of one big donut! 😉

This recipe is super easy to make, and is one of our favorite Valentine’s treats.

Happy Baking Everyone!

Image

Image
Laura baking with love! xo

Oh, I just have to point out this vintage apron I’m wearing.
My parents got it for me this Christmas and I was more than giddy over it.
Love. It. So. Much.
It’s so hard to find cute aprons so I couldn’t be happier when I laid my eyes on this one!

Image

Baked Red Velvet Mini Donuts Recipe

Donut Batter:
{yield 4 dozen mini donuts}
1 tbs. red food colouring
2 tbs. cocoa powder
2 c. flour sifted
3/4 c. granulated sugar
2 tsp. baking powder
1/2 tsp. salt
3/4 c. buttermilk
1 tsp. pure vanilla extract
2 eggs, lightly beaten
2 tbsp. melted butter

Directions:

Mix together food colouring and cocoa powder to form a paste in small bowl.
Preheat oven to 375 F. Spray donut pans with a nonstick cooking spray.
In a large mixing bowl sift together flour, sugar, baking powder and salt.
Add buttermilk, eggs, vanilla extract, butter and the red paste mixture beating until combined.

Fill each donut cup approximately 3/4 of the way full.
Bake 5-8 minutes making sure to not over cook. (In our oven they were perfect after 5 minutes)

Let donuts cool in the pan an additional 3-5 minutes before removing onto a wire rack.
Let donuts cool completely before icing.

Vanilla Glaze Icing:
2-4 tbsp. hot water
2 c. confectioner’s sugar
1 tbsp. milk
1/2 tsp. vanilla extract

Directions:

In a small bowl, stir all of the ingredients together until sugar is completely dissolved. Use icing immediately to glaze tops of the donuts. We found it was easy to dunk the tops of the donuts into the glaze then place onto a wire rack until set.
Tip: If icing forms and becomes too thick while glazing the donuts, add a drop or 2 of hot water, mixing well.

Happy Valentine’s Baking!
Laura & Natasha xo

Standard
Recipes

Pink & White Vanilla Delight Cupcakes

Image

Valentine’s Day is right around the corner, so in keeping with our ‘Valentine’s Day Baking‘ theme, we have yet another Valentine’s recipe to share with you guys!

This is my favorite recipe yet. These Pink & White Vanilla Swirl Cupcakes really are perfect for Valentine’s Day.
These cupcakes have a cake-like consistency (from the cake flour), and are light, tender and fluffy.
They even taste delicious without the icing – we almost ate them all up before icing them!

Really though, the best thing about these cupcakes is obviously how pretty they are.
They really are gorgeous to look at – the pink & white marbled cake with the bright pink & white swirl icing make these cupcakes the ultimate Valentine’s treat!

Happy Valentine’s Baking!

Image

Image

Image

IMG_2502

Pink & White Vanilla-Delight Cupcakes Recipe

Ingredients:
{yield: approx. 2 dozen cupcakes}

5 large egg whites, at room temperature
3/4 cup (total) whole milk, at room temperature
1 tablespoon pure vanilla extract
2 3/4 cups cake flour, sifted
1 3/4 cups sugar
1 tablespoon + 1 teaspoon baking powder
3/4 teaspoon salt
3/4 cup unsalted butter, at room temperature
pink or red food colouring

For the Vanilla Buttercream Icing:

3/4 cup unsalted butter, at room temperature
2 teaspoons vanilla extract
4 cups icing sugar
4-5 tablespoons milk (preferably whole milk)
pink food colouring

Directions:

Preheat oven to 350 degrees F.
In a medium bowl, combine the egg whites, 1/4 cup of the whole milk, and the vanilla extract. Stir till combined; set aside.

In the bowl of your stand mixer fitted with the paddle attachment, combine all the dry ingredients together (cake flour, sugar, baking powder, & salt) on low speed for approx. 30 seconds.
Add in the butter and the remaining 1/2 cup of whole milk & mix on low speed until just combined. Increase speed to medium and mix for 1-2 minutes.
Add the egg mixture in three separate batches, beating on medium speed for approx. 20 seconds after each addition.

Divide the batter in half and add a good amount of pink food colouring to one half of the batter. Mix until the food colouring is coated evenly.

Using a spoon, put a spoonful of white batter into each cupcake cup. Top with a spoonful of pink batter, and repeat until cups are 2/3’s full. After, use a butter knife to gently marble the colours.

Bake for 15-20 minutes, or until a toothpick inserted in the center comes out clean. (A few little crumbs on the toothpick is good – you don’t want to overcook them!).

For the Icing:

In the bowl of your stand mixer fitted with the paddle attachment, cream the butter until smooth. Add the vanilla extract. With the mixer on low speed, slowly add in the icing sugar. Scrape down the sides of the bowl as necessary. Add the milk and beat on medium-high speed for 3-4 minutes until icing is light and fluffy. You may need to add a little more milk to get it to the consistency of your liking. Divide icing into two batches, and mix in the pink food colouring to one of the batches.
To get the pink and white swirl icing – Using a piping bag fitted with a 1M star tip, fill one side of the icing bag with white icing, and the other side of the bag with the pink icing.

IMG_2480

Happy Baking!
Natasha & Laura xo

Standard
Recipes

Chocolate Rum Balls

Image

We started early with the Valentine’s baking and now we can’t stop! Until Valentine’s Day is finally upon us, there will be plenty more sweetness to come. Valentine’s Day is all about chocolates and sweet treats so today I thought I’d make some Chocolate Rum Balls. I’ve been making these Rum Balls for many years. I used to make them every year for Christmas Eve and bring them to my Uncle’s as they were his favourite. They’re a pretty little addition to any dessert tray or cookie platter.

Image

Image
We found these pretty little cups at Michael’s. Adorable!

Image

Chocolate Rum Balls Recipe:

{yield 20-25 Rum Balls}

1 125g pkg of cream cheese
1 c. ground almonds
1 c. icing sugar
1 tsp. instant coffee
1/4 c. dark rum
3 squares unsweetened chocolate, melted (can melt in microwave approx 40 sec)
Topping Suggestions: Sprinkles, icing sugar, toasted coconut

Directions:

Blend cream cheese until fluffy. Stir in almonds, icing sugar, powdered instant coffee and rum. Mix well.
Add in melted chocolate.
Cover bowl with plastic wrap and refrigerate until mixture is easy to handle. (approx. 1 hour)
Roll mixture into 1 inch balls (tsp size amount) and roll into desired toppings.
Tip: I placed the rolled balls onto a sheet of wax paper and then sifted powdered coatings on top instead of rolling the balls in the coatings.

Refrigerate in an airtight container in the fridge for up to 3-4 days.

Image

Happy Valentine’s Baking!
Laura & Natasha xo

Standard
Recipes

Sugar Cookies

Image

Can you believe Christmas is over & we’re well into the New Year?! And guess what’s right around the corner? Yup, it’s all about hearts, love, chocolates & candy – oh my! Okay, we may be jumping the gun just a tad but we can’t help it. We love occasions and any reason to celebrate something. We wasted no time, got all of our Christmas decor packed away and brought out our Valentine’s decor, then spent the entire day making these Valentine’s Day cookies. I’m not even kidding… a whole day. We have made Valentine cookies every year, but this year we decided to get more creative with the decorating. We searched the internet, browsed some of our favourite cookbooks and got to it.

Image

Can I just say that we were greatly naive in thinking that it was going to be a breeze, a cake walk, an easy task. Decorating cookies takes a lot of time, technique and patience. Don’t let those baking shows on tv fool you! They make everything appear so simple.

Image

When we finally figured out how to make the Royal Icing into various batches of colours and consistencies, (firmer batch for detailing and a more fluid batch for filling) we were on our way.
Oh, and may I just share a tip – make sure you twist tie the tops of the icing piping bags like the recipe says to, otherwise you will have big blobs of icing suddenly spilling out of the top and all over the front of your clothes and on top of the masterpiece decorated cookie you have been working on so diligently. Yeah, that happened. More than once! ha!

Image

Image

Image

Image

Image

Image

Image

Image

Sugar Cookies Recipe

Ingredients:
{yield: approx. 60-80 cookies}
2 cups unsalted butter, at room temperature
3 cups Sugar
2 large Eggs
1 tsp. Pure Vanilla Extract
1 1/2 tsp. Salt
5 cups Flour
Coloured Sprinkles for decorating

Directions:

In a large bowl, beat butter and sugar with an electric mixer on medium-high speed until light and fluffy. Approx 5 minutes. Add eggs, vanilla and salt, mix until combined. With mixer on low speed add flour and mix until combined.
Cover bowl with plastic wrap and refrigerate for at least 2 hours (or up to 1 week).

Preheat oven to 350.
Turn dough onto a clean lightly floured surface. Divide into 4 sections.
Roll out dough into 1/4-inch thickness and cut into desired cookie cutter shapes.
Place onto prepared cookie sheets 2 inches apart and bake until golden brown, approx 12-15 minutes.
Transfer cookies to a wire rack to cool.
Cool cookies completely before icing.

Royal Icing Recipe:

Ingredients:
4c. Icing Sugar
3tbsp. Meringue Powder
1/2 – 3/4c. Warm Water

Directions:

In an electric mixer beat icing sugar and meringue powder until combined. Add the water and beat on medium speed until very glossy and stiff. (approx 5-7 minutes)
If necessary to achieve the correct consistency, add more icing sugar or water.
Remember: To flood the entire cookie surface with icing, the proper consistency is a little more fluid.
To do detailing the icing consistency should be much more firm.

Image

It took us 5 hours to decorate approx 60 cookies! It was a lot of trial and error, mistakes and mishaps and a very messy kitchen- should’ve taken a picture of that! Mostly it was so much fun. We had a blast. At times we were almost falling over with laughter at each other!

Image

Happy Valentine’s and Happy Baking!
Laura & Natasha xo

Standard
Recipes

Gingerbread Cupcakes

Image

Gingerbread is a Holiday classic & we just can’t get enough.
We are still on a total gingerbread kick after baking batch after batch of our Gingerbread Cookies this holiday season.
The Gingerbread cookies were a hit and we ended up making a lot more than we expected since friends & family kept requesting them! They were definitely our star holiday cookie this year.

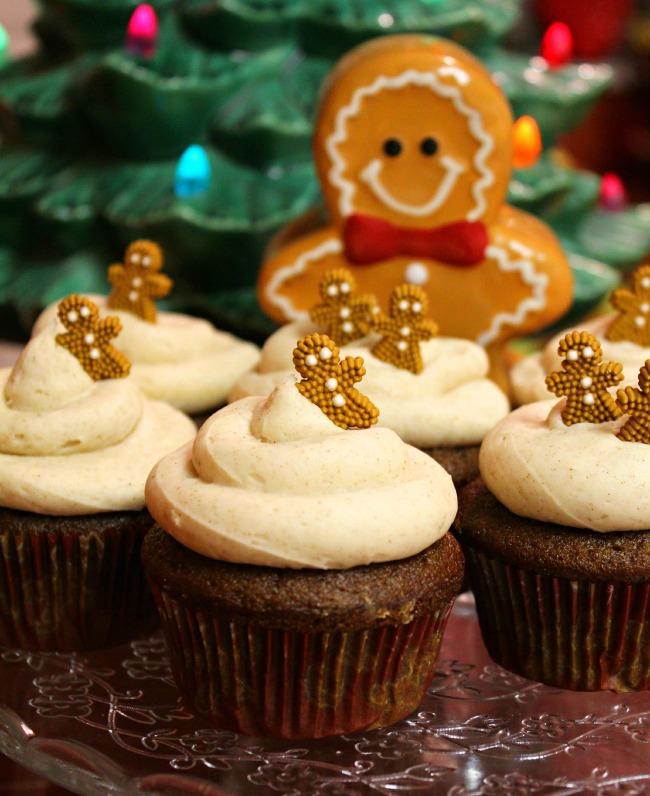
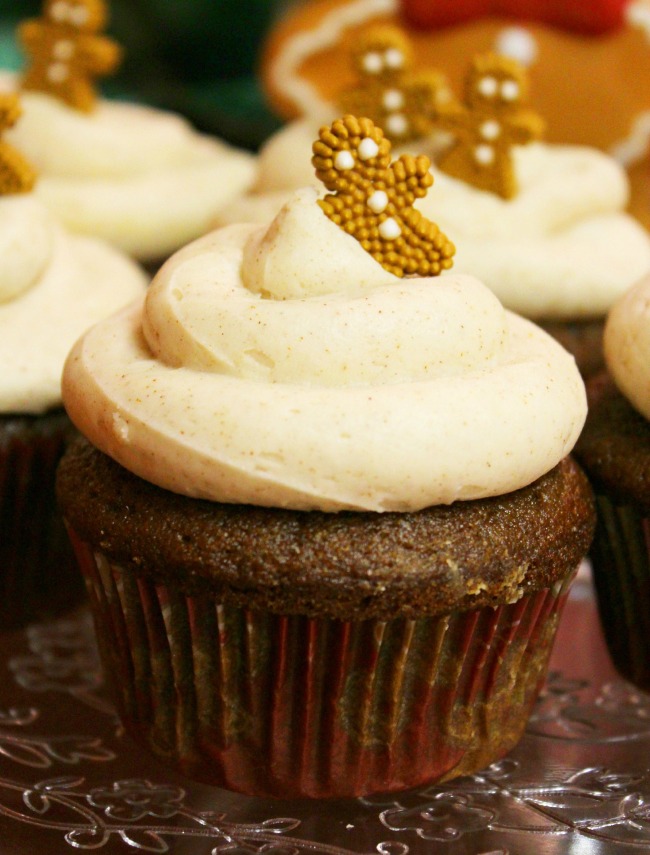
We couldn’t let our gingerbread addiction end with just cookies this year though, so we decided to make Gingerbread Cupcakes!

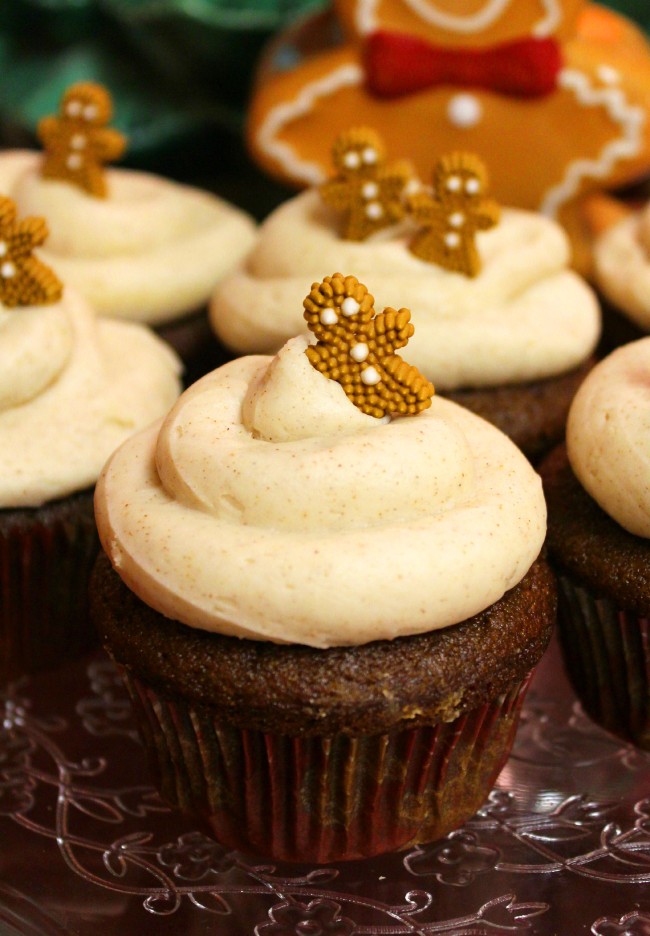
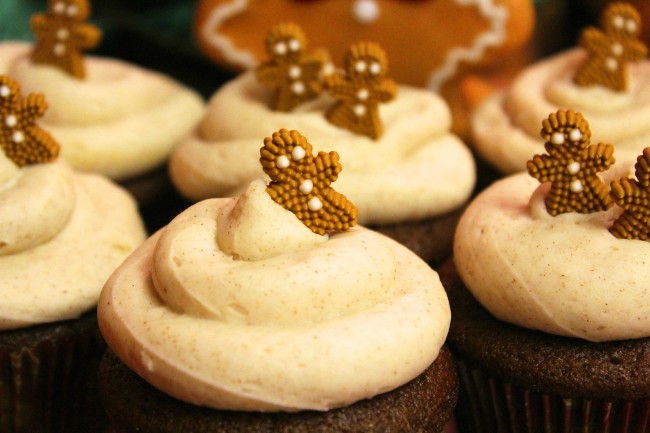
These really are the perfect Winter cupcake. Super moist spiced cupcakes, with deliciously creamy cinnamon spiced cream-cheese icing. Mmmm. And nothing tastes more like Winter than the brilliant combo of ginger, cinnamon, nutmeg, and molasses!

If you are a Gingerbread lover, you have gotta try these cupcakes. The combo of the ginger-spiced cake with the sweet & tangy cinnamon cream cheese icing go together like peanut butter + jelly. 😉

These are fairly simple cupcakes to make and I love them because there are plenty of different adjustments you can make to alter the taste of the cupcakes to your liking:

If your not into the cinnamon cream cheese icing, try white chocolate frosting, chocolate frosting or even plain vanilla frosting. You could even leave the icing off completely and enjoy them as muffins.

You can alter the spices as you wish. If you’re not a fan of a certain spice, put a bit less/or omit it completely and up the quantity of a spice of your choice.

Instead of the little gingerbread men cupcake toppers, you can use sprinkles or if you want to get real fancy – bake a batch of gingerbread cookies, use a fairly small gingerbread man cutout and stick the gingerbread man cookie on top of the icing.

We had lots of fun baking & decorating these cupcakes and they really are every bit as tasty as they are cute.
We hope everyone had a wonderful New Year, and hope you enjoy this recipe!

Image
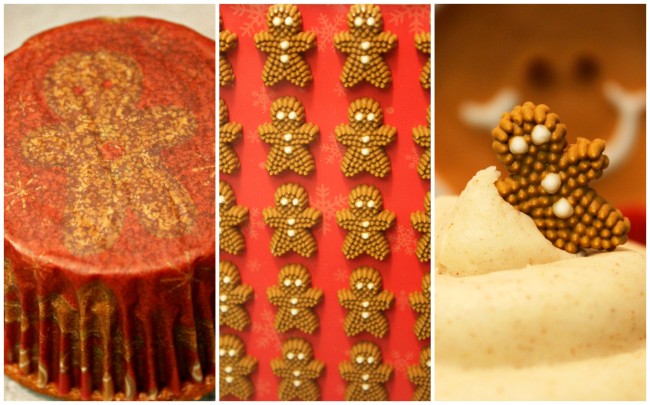
How cute are these Gingerbread Men Cupcake Cups & Decor?!
The cups and little gingerbread toppers are both Wilton brand & can be found at Michaels & certain grocery stores.
You can also buy them online here.

Image

Image

Gingerbread Cupcakes with Cinnamon Cream Cheese Frosting Recipe
{recipe slightly adapted from The Cupcake Diaries}
{yield: approx. 20 cupcakes}

Ingredients:
2 3/4 cups all-purpose flour
2 tablespoons + 1/4 teaspoon ground ginger
2 teaspoons baking soda
1 1/2 teaspoons cinnamon
1/2 teaspoon ground cloves
1/4 teaspoon nutmeg
1/4 teaspoon salt
10 tablespoons unsalted butter, room temperature
1 cup brown sugar
3 large eggs, at room temperature
1 1/4 cups molasses
1 cup hot water

Frosting Ingredients:
4 tablespoons unsalted butter, room temperature
3-4 cups icing sugar
1/4 teaspoon vanilla extract
6 ounces cream cheese, room temperature
2 teaspoons ground cinnamon
pinch of nutmeg
2 teaspoons milk

Directions:

Preheat oven to 350 degrees F. Line muffin pans with cupcake liners, or spray pans with non-stick cooking spray if you’re not using baking cups.
In a large bowl, sift together all (flour, ginger, baking soda, cinnamon, cloves, nutmeg, salt) of the dry ingredients EXCEPT for the brown sugar. Lightly whisk the ingredients to combine them slightly than set the bowl aside.

In the bowl of your stand mixer fitted with the paddle attachment, cream the butter & brown sugar for a few minutes until light & fluffy. Add the eggs one at a time and mix slowly after each addition. Add the molasses and mix until well combined. Next add one third of the dry ingredients and one third of the cup of water and mix thoroughly. Repeat this step, scrape down the sides of the bowl as necessary. Add the last third, starting with the dry ingredients than add the last third of the water and mix until well combined.

Scoop the batter evenly in the cupcake liners. Bake for 16-19 minutes, or until a toothpick inserted in the center comes out clean. Transfer pans to a wire rack to cool completely.

Frosting:

In the bowl of your stand mixer fitted with the paddle attachment, mix all ingredients (except for the milk) together until well combined. To help the icing come together and to make it a bit smoother/creamier, add 2 teaspoons of milk. Continue mixing until the icing is to your preference.

Image

Natasha & Laura xo

Standard
Recipes

Chocolate Peanut Butter Chip Cookies

IMG_2265g2

I’m excited to share this recipe with you guys today because not only is it the simplest cookie recipe that we’ve posted, it also requires minimal ingredients! You will most likely already have all the ingredients on hand which makes these cookies even better.

I wanted to make some classic chocolate cookies but didn’t have certain ingredients on hand and of course it was too late at night to run to the store, so I scoured the cupboard and made these delish simple, soft chocolate cookies using the ingredients that I had on hand.

This is an extremely simple recipe which doesn’t require any crazy ingredients. It’s the perfect cookie recipe if you are in a rush and want to whip up some cookies for kids, or to satisfy your sweet-tooth cookie craving in a snap! (Sometimes you just need a cookie ASAP.) 😉 These cookies bake up nice and soft, and are a perfect mix of fudgy chocolate with a hint of peanut butter.

I used Reese’s Peanut Butter Chocolate Chips, but feel free to use the chocolate chips of your choice! For an extra fudgy, doubley chocolate dose – try using semisweet or dark chocolate chips.

Image

Image

Image

Image

Image

Chocolate Peanut Butter Chip Cookies

Ingredients:
{yield: approx. 18-20 cookies}

1/2 cup unsalted butter, softened
3/4 cup sugar
1 egg
1 teaspoon vanilla extract
1 cup all-purpose flour
1/3 cup cocoa powder
1/4 teaspoon baking powder
1/4 teaspoon baking soda
1/8 teaspoon salt
1 cup Reese’s Peanut Butter Chocolate Chips (or any flavour chocolate chips of your choice)

Directions:

Preheat oven to 350 degrees F. Spray baking sheets with non-stick cooking spray & set aside.
In the bowl of your stand mixer fitted with the paddle attachment, mix the butter, sugar, egg and vanilla extract until light and fluffy.

In a separate medium bowl, combine the flour, cocoa powder, baking powder, baking soda, and salt. Slowly stir the dry ingredients into the wet ingredients and mix until combined.

Using a 1 tablespoon cookie scoop (or spoon), scoop out dough and using your hands, roll the dough into balls. Place balls on baking sheet and slightly flatten them with the palm of your hand.

Bake for only 8-10 minutes, until just set. Allow cookies to cool slightly on the cookie sheets before transferring cookies to a wire rack.

Enjoy!
Natasha xo

Standard
Recipes

Banana Muffins

Image

The year is coming to a close which means that sadly all the holiday baking is nearing its end as well.
It’s bittersweet – I’ll miss all the nummy Christmas cookies & holiday baking but I think we can all agree that it’s almost a relief when it’s over. (I know I have definitely eaten way more than my fair share of Christmas cookies this year!) So to end the year off right, I thought I’d switch it up a bit, take a break from all the cookie recipes and post a slightly healthier recipe for you guys!

Banana is one of my favorite fruits to bake with – It gives baked goods an amazing flavour, and helps keep them nice and moist. These simple banana muffins are no exception – they really are the moistest/most delicious banana muffins I’ve ever tasted. I’ve made them multiple times in the past few weeks and they are always eaten up quickly!
This recipe is perfect for those ripe leftover bananas sitting in the kitchen, and it’s a super easy recipe to whip up which is always nice.

We hope everyone had a fantastic Christmas & that you enjoy this recipe! xo

Image

Image

Banana Muffins Recipe

Ingredients:
{yield: 12 muffins}

4 very ripe bananas, mashed
1 large egg, lightly beaten
1/2 cup granulated sugar
1/3 cup butter, melted
1 1/2 cups all-purpose flour
1 teaspoon baking powder
1 teaspoon baking soda
1/2 teaspoon salt
1/2 teaspoon cinnamon
1/3 cup pecans, chopped

Directions:

Preheat oven to 350 degrees F. Grease or spray muffin pan with non-stick cooking spray; set aside.

Mash the bananas and add the egg, sugar and butter; mix until ingredients are combined.

In a medium bowl, whisk the flour, baking powder, baking soda, salt, cinnamon and pecans together.

Add the dry ingredients into the wet ingredients and mix until nearly all the flour has disappeared. (Don’t overmix – overmixed muffins turn out tough).

Pour batter evenly into the muffin pan and bake for approx. 20 minutes.

Enjoy!
Natasha xo

Standard
Recipes

Maraschino Cherry White Chocolate Chip Cookies

Image

I’ve never baked anything using maraschino cherries before, but my Grandma gave me some cherries to bake with so I decided to make Maraschino Cherry White Chocolate Chip Cookies!

Don’t let the maraschino cherries scare you – they really don’t taste strongly of cherry, and are actually really nummy when baked in a cookie. My mom & brother both cringed when I said I was baking maraschino cherry cookies. I literally had to make them try a bite – But like I suspected, they were both surprised and loved the cookies!

The white chocolate balances out the sweetness of the cherries, making the cookies not overly sweet, but just right.
These cookies are large, soft & chewy but my favorite part of these cookies is how Christmasy they look. The red & green cherries make for the perfect Christmas cookie!

Happy Holiday Baking!

Image

Image

Maraschino Cherry White Chocolate Chip Cookies Recipe
{Note: This recipe requires chilling the dough for 3 hours.}

Ingredients:
1 cup unsalted butter, softened
4 oz. cream cheese, softened
3/4 cup brown sugar
3/4 cup sugar
2 eggs
3 1/4 cups flour
1 tsp salt
1 tsp baking soda
3/4 cup maraschino cherries, cut into small pieces & patted dry
1 cup white chocolate chips

Directions:

1. In a saucepan, melt the butter until completely melted and no chunks remain, than set aside to cool.
Once the butter has cooled: In the bowl of your stand mixer fitted with the paddle attachment, cream the butter, cream cheese, brown sugar, and granulated sugar together until nice and smooth. Add the eggs, and slowly mix until combined. With the mixer on low-speed, mix in the flour, salt, & baking soda and mix until just combined.
Using a spatula, fold in the cherries and white chocolate chips.

2. Cover the dough and refrigerate for at least 3 hours. (or overnight)

3. When ready to bake, preheat oven to 375 degrees F. Line or spray baking sheets with non-stick cooking spray.
Using a 1/4 cup, scoop out the dough and roll into balls. Place on the baking sheets, and flatten the balls slightly using either the bottom of a cup, or the palm of your hand. Bake for 9-12 minutes, just until the edges are golden.

Enjoy!
Natasha xo

Standard